scrappy mini quilt love + how to
Don't you just love fabric ... admiring fabric, making beautiful things with fabric, sorting through your fabric scraps remembering the projects you've made?Using those treasured scraps is a whole new, wonderful adventure.
I really, really love scrappy projects. No matter how big or how small those scraps of fabric are, any piece saved will one day make it into a happy, scrappy project.
Sometimes it can be a bit daunting deciding how those treasured fabric scraps will best play happily together. That's when I reach for "Sunday Morning Quilts" by Amanda Jean Nyberg and Cheryl Arkison.

The adorable Wynne Bunny I recently crocheted using Ali's pattern, has a "ticker tape" mini quilt to keep her warm at night. (The poor wee lass is still waiting for her new clothes.)
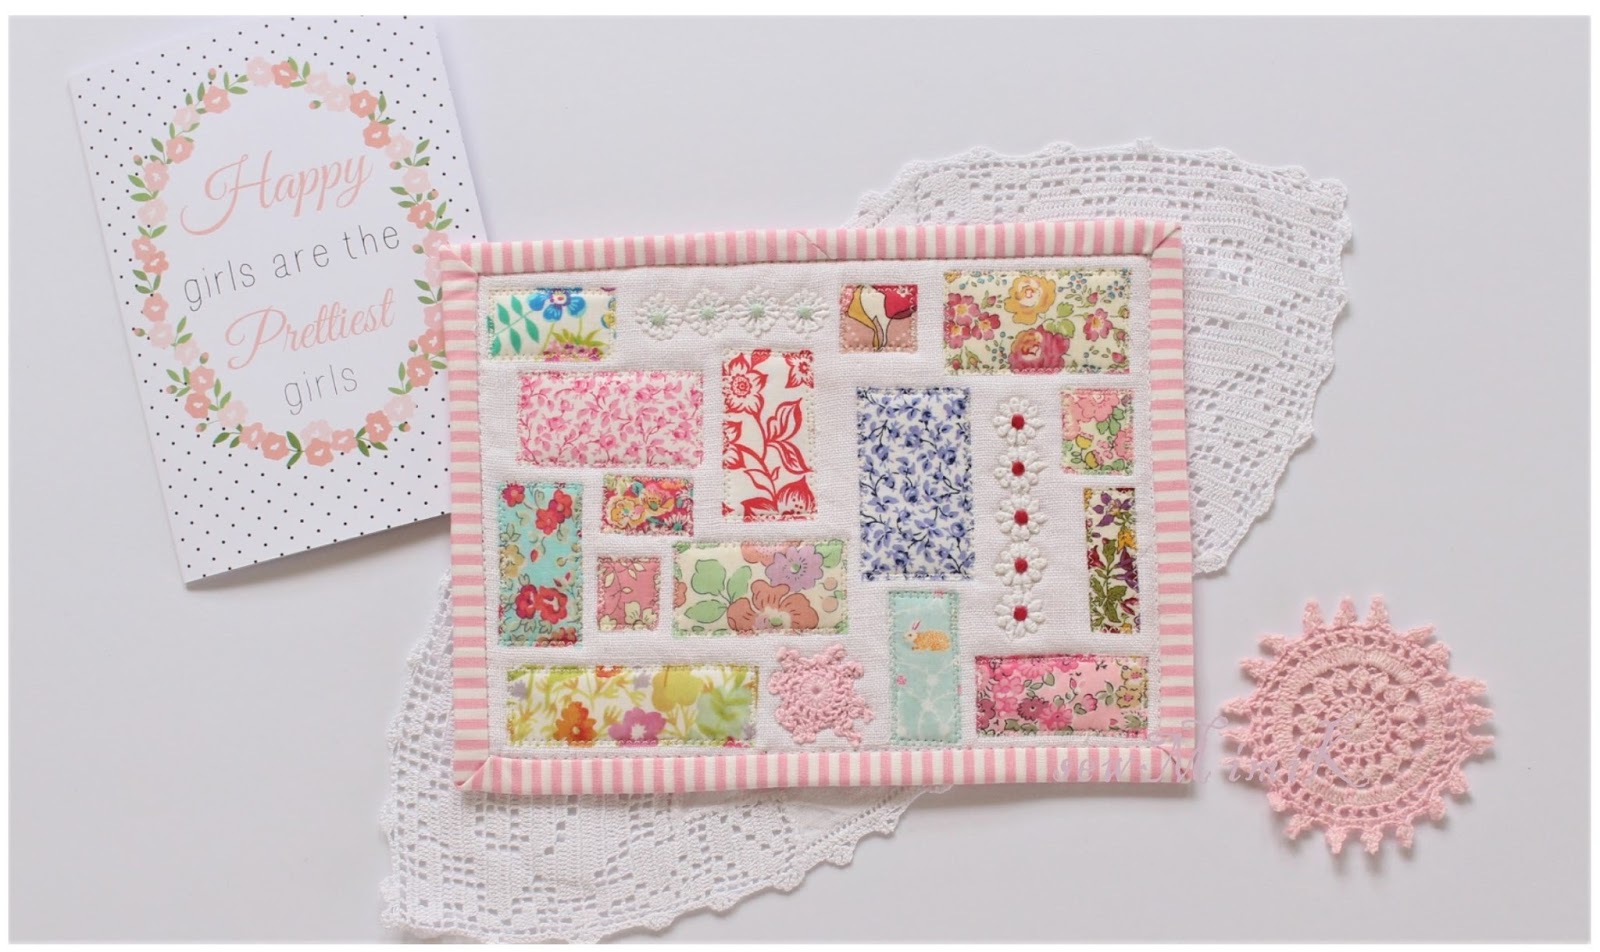
Because Wynne is only small, I decided to make her quilt with tiny, precious Liberty fabric scraps.

The finished size of this mini quilt is 8 inches x 6 inches.
You will need:
- 10 inches x 8 inches plain coloured background fabric
- 10 inches x 8 inches quilt batting
- 10 x 8 inches backing fabric
- assorted pretty scraps of fabric and/or trim
- 2 1/4 inches x Width Of Fabric for binding
- double sided fusible web or fabric glue pen
- general sewing supplies

Draw a rectangle on the background fabric measuring 8 inches x 6 inches (blue line). This is a guide for the area of quilt you will see when the quilt is finished.
Draw another rectangle outside the blue rectangle allowing 1/4 inch all the way around (pink line). This line will be a guideline for trimming. Set aside.
Press double sided fusible paper to wrong side of fabric scraps. Alternatively, you may like to temporarily glue each piece down with a fabric glue pen.

Cut fabric scraps various sizes and arrange in a way that pleases you. Don't forget to keep everything within the blue line.
One at a time, remove the paper backing from the fusible web, placing each fabric scrap back in its original position.
Press with the iron to fuse the fabric scraps to the background.
Place backing fabric Wrong side up on table.
Place batting evenly on top.
Place mini quilt top Right Side up on top of batting.
You might choose to pin all three layers together at this point.
Take your quilt sandwich to the sewing machine and sew around each scrap to applique it to the background. I used a narrow zigzag stitch - machine width 3mm, and stitch length about 2.5mm.
This stitching also quilts the mini-quilt as well!

Trim your mini-quilt to 8 inches x 6 inches i.e. the pink line. Set aside.
Cut the binding fabric 2 1/4 inches wide x the Width Of Fabric. Some quilters cut binding 2 1/2 inches wide but this width works better for me.

Press the binding strip in half length wise, raw edges together and Right Sides out.
Ready to sew on the binding?
Lay the folded binding along one long side of the quilt top with raw edges matching. It doesn't show up in the photo but the end of the binding almost reaches the other corner of this side of the quilt top.
See the blue line in the photo below? It's only about 1 inch long. It stops 1/4 inch before it reaches the next side, then pivots 45 degrees out to the raw point of that corner. The blue line shows your first seam.
Don't forget to backstitch at beginning and end of seam. Cut sewing thread.

The next step feels tricky but will soon become automatic.
The photo below shows how to fold the binding before sewing. The dark green line on the new side must fold up and onto the dark green line on the sewn side.
The light green line shows the position of the hidden inverted fold line which enables the binding to sit flat.

Does yours now look like this?
Let's mark the next seam. The blue (stitching) line starts right on the end, goes down the short side of the quilt (1/4 inch away from the edge) and pivots out to the next raw corner, 1/4 inch before reaching the next side.

Repeat those steps until the binding is sewn along three sides and four corners.
You can see that when I came to the fourth side I only stitched for about an inch - just like I did at the beginning of this side.

It's time to see how much binding needs to be trimmed away.
Overlap the ends of the binding as in the photo below. We want the ends to only overlap by exactly the same measurement we cut the binding at, i.e. 2 1/4 inches.

At this point I always, always, always turn my quilt, so the join in the binding I'm about to stitch, is sitting at the top.
Open out the binding Right Sides facing.

Pins are handy to have for this next stage.
Taking the binding on the right, turn it Wrong Side up, and on top of the left side binding. Match all raw edges.
Pin for your sanity's sake. The quilt will not lay flat at this stage.

Align the 45 degree line of your quilting ruler, along the raw edge of the binding (red line).
Draw a line connecting the points where the ends of both bindings pieces meet. *I've moved my ruler slightly so that you can see the blue line I marked.
This blue line is the seam line.

When this seam is stitched, fold the binding along its original pressed crease to check everything is correct.
And yes, I have several times trimmed off "excess" binding before realising I'd sewn it incorrectly ... groan.

All good? Open out again and trim seam allowance before pressing this bias seam carefully.

Matching raw edges of binding with quilt, sew the last bit of binding to the quilt.
Clever you!
Press binding away from the quilt.
Now ... I usually sew my bindings down by machine and here is how I do it ...

Fold binding away from the front and around to the back. Finger press.
The blue line shows where to stitch.
Set your sewing machine to a straight stitch with 3 mm stitch length.
This is called "stitching in the ditch". This line of stitching becomes almost invisible if you go slowly and stitch carefully.
Some quilters like to pin down the binding or hold it with clips. Those techniques have never worked terribly well for me so I prefer just to fold the binding to the back, and hold it while I stitch. It can help to have a non-slippery hand cream close by to use if your hands are a little dry.

Sew down the whole binding by stitching in the ditch, pivoting at the inside of each corner as you go. There is no need to hand stitch the corner folds down, as they should hold in position.
If, when I turn the finished quilt over I discover that some areas of binding are not stitched down ... oops, I grab a needle and thread and hand sew those sections. I figure it's all a learning process, and we get better with practice. We really do!

Thank you for popping in today to read along with how I made this mini quilt.
I hope you've enjoyed the post and perhaps even found it a little useful.
Happy stitching,
Kellie
xo
What a gorgeous little project...your instructions are beautifully clear...thankyou for sharing! xAli
ReplyDeleteThank you so much Ali, I'm having lots of fun with your Wynne Bunny pattern! xo
DeleteSuch a beautiful little quilt using all those loved little pieces. Thank you for the directions.
ReplyDeleteYou're very welcome Paula, I hope you have fun with your own "ticker tape" projects :) x
DeleteAbsolutely adorable and a super tutorial!! Now my bunny is jealous and feeling a little naked. She's staring at me now. Better make her a little something cute to cover up!!
ReplyDeleteThose eyes follow you around the room don't they, just like the Mona Lisa :) :) xo
ReplyDeleteWynne's quilt is just gorgeous Kellie! I really love the pink and white candy stripe, it's lovely. The standout thing in this whole post is how clearly and easily you have shown the mitered corners and shown how to do binding. Next time someone asks me about them, I shall send them right here! Your photos and explanation are perfect :-))) Megan
ReplyDeleteI'm so glad you found the post useful Megan :) Nice, neat corners are easy to achieve but make a huge difference xo
Delete